Your graphics card ships with a conservative speed limit, and many cards have a little headroom above it. Learning how to overclock GPU hardware means raising the core and memory clock speeds past the factory setting to gain a few extra frames, and the process is easier than it sounds. This guide covers the one-click options in the NVIDIA app and AMD Software, the full manual method in MSI Afterburner, how to confirm the result is stable, and what to do when the screen glitches. If your goal is a cooler, quieter card instead, read our undervolting guide, which is the opposite tuning direction.
How to overclock & undervolt your graphics card with GPU Tweak III
Overclocking through software is generally considered safe when you raise the clocks in small steps. Graphics cards have built-in protection and lower their own clock speed or voltage as they near a limit, and an unstable setting usually shows up as a driver crash, a flicker or a freeze that goes away after a restart. Even so, it is a change outside factory settings. The card will run hotter and draw more power, and AMD states that damage from running outside factory settings is not covered by its product warranty. Treat every number in this guide as a starting point, because two cards of the same model can overclock differently. That variation is often called the silicon lottery.
Do not expect miracles either. Raising the clock by 10 percent does not raise your frame rate by 10 percent, and gains depend on the game, the memory and the rest of your system. A modest, stable boost is the realistic outcome.
Pick a repeatable load, such as the built-in benchmark of a game you play or a free tool such as FurMark or Unigine Heaven.
Run it at stock settings and write down the average frame rate or score, plus four readings: GPU clock, memory clock, voltage and temperature.
Save your work and close other apps. Crashes are a normal part of finding the limit.
The Easiest Way to Overclock a GPU: Automatic Tuning
If you do not want to touch sliders, both big GPU makers include a one-click scanner that finds a stable overclock for your specific card.
NVIDIA App (GeForce RTX Cards)
Open the NVIDIA app and choose System from the left-hand menu.
Click the Performance tab. You will see your current GPU clock, voltage and VRAM clock.
Switch on Automatic Tuning and click Agree & Continue on the disclaimer.
Let the scan finish. It takes roughly 10 to 20 minutes, and you should avoid gaming, video playback and recording while it runs.
The scan raises the clock in small steps while checking for errors, then keeps a profile that suits your card. Power users can also adjust the voltage, power and temperature targets on the same screen.
AMD Software: Adrenalin Edition (Radeon Cards)
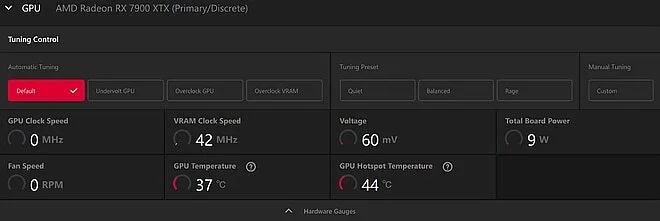
Open AMD Software, type “Tuning” in the search box and open Performance Tuning.
Under Automatic Tuning on the GPU tab, choose Overclock GPU. On select cards you also get Overclock VRAM for the video memory.
Automatic Tuning on the GPU tab offers Overclock GPU and Overclock VRAM on supported Radeon cards. (Image: AMD)
Pick a Tuning Preset if you want a simpler option. Quiet lowers power and fan settings, Balanced mixes both, and Rage raises the power limit for more headroom. Presets are available on RX 6000 series cards and newer.
Automatic results are usually more conservative than a hand-tuned profile, but they are quick and low risk. If you are happy with the gain, you can stop here.
How to Overclock a GPU With MSI Afterburner
MSI Afterburner is free, works with NVIDIA GeForce cards and most Radeon cards, and does not require an MSI graphics card. Download it only from msi.com or guru3d.com, because fake download sites exist.
Set Up Afterburner
Install Afterburner along with RivaTuner Statistics Server, which adds the monitoring overlay.
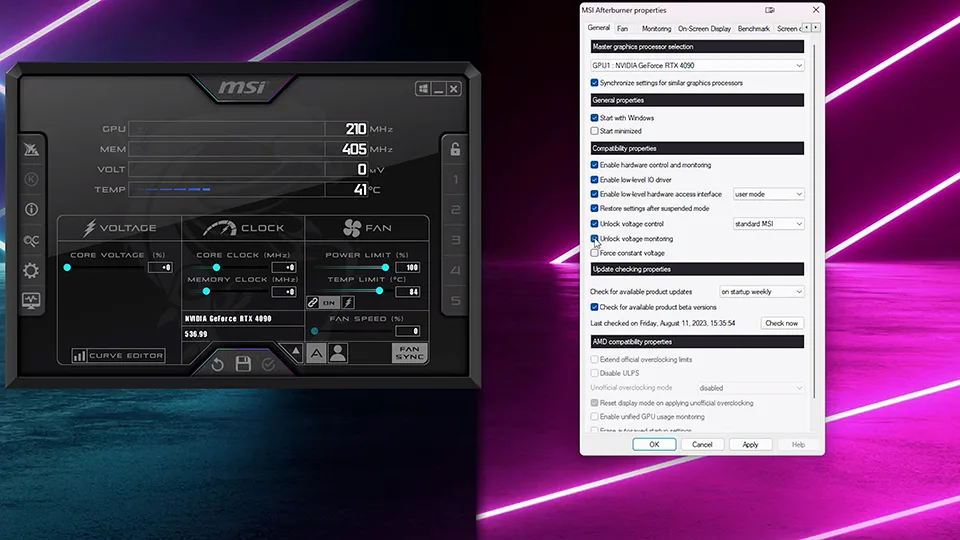
Open Settings and, on the General tab, enable Unlock voltage control and Unlock voltage monitoring. Turn on Start with Windows as well, so your profile loads at boot.
Click OK and restart Afterburner when it asks, so voltage readings appear in the main window.
Enable Unlock voltage control and Unlock voltage monitoring on the General tab. (Image: MSI)
Option A: One-Click OC Scanner
OC Scanner builds a custom voltage and frequency curve for your card. It takes about 30 minutes, sometimes less, and works on almost any GPU.
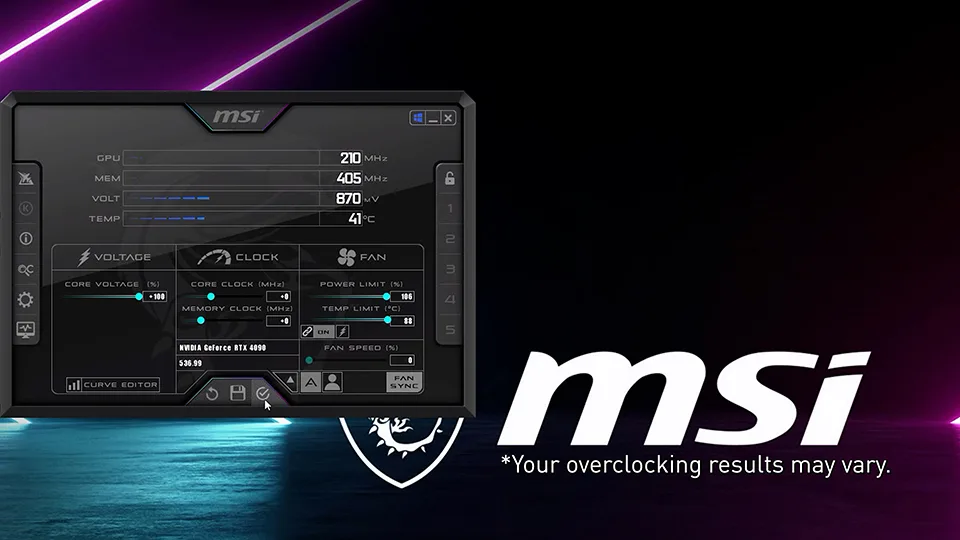
Drag the Power Limit, Temp Limit and Core Voltage sliders all the way to the right, then click the checkmark to apply.
Raise the limits first, then click the checkmark to apply. (Image: MSI)
Click OC Scanner in the upper-right corner of the main window (the magnifying glass icon labeled OC), then click Scan.
When it finishes, Core Clock shows Curve and the memory clock may start at a conservative value such as 200 MHz.
Click the floppy disk icon and then a profile number to save it. Click the checkmark to apply.
Number keys 1 to 5 load a saved profile, and Ctrl+D resets the card to default without erasing your profiles.
Option B: Manual Overclock
Manual tuning takes longer but lets you find the limit yourself. Change the core clock first and the memory clock second, and only one slider at a time.
Drag Power Limit and Temp Limit to the maximum and click Apply.
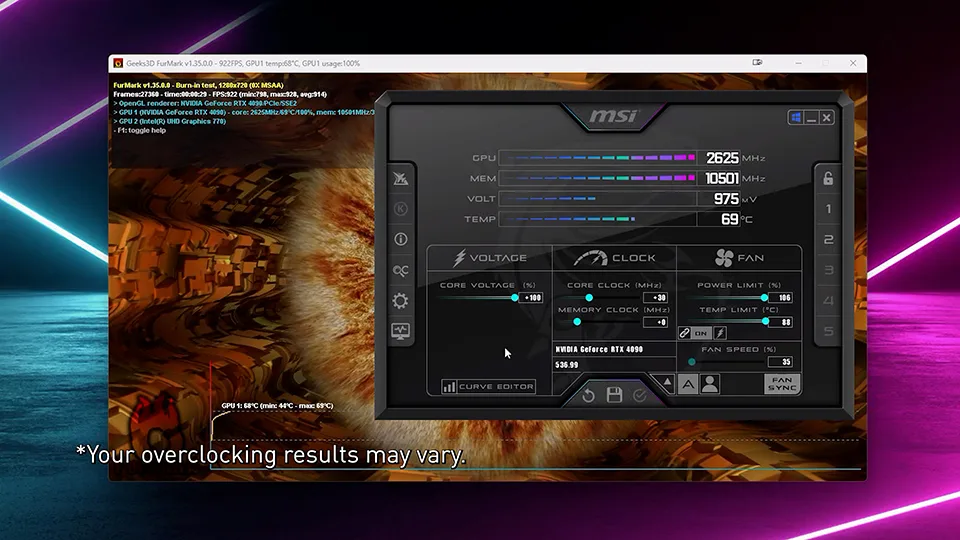
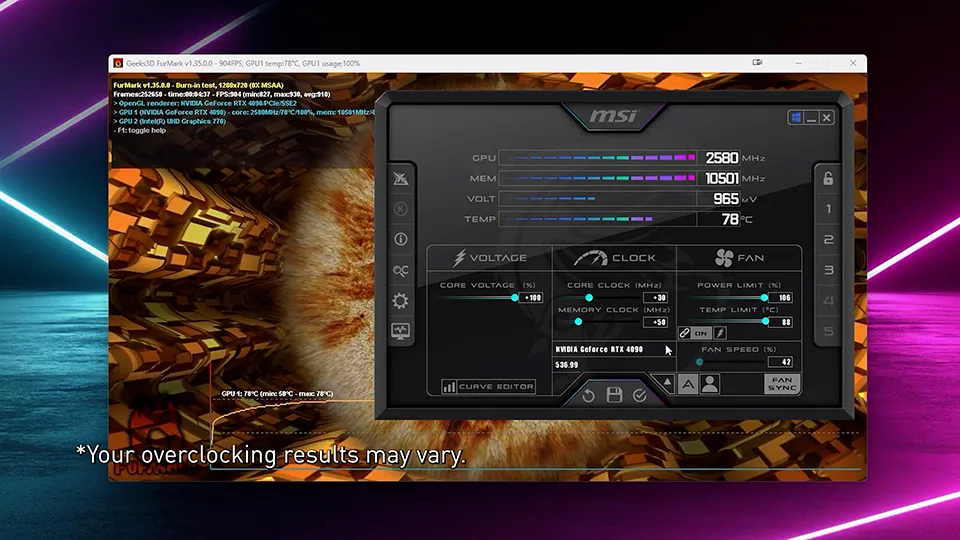
Raise Core Clock (MHz) by 20 to 30 MHz and click Apply.
Run your benchmark and watch for crashes, flicker or odd shapes on screen, which are called artifacts.
Raise the core clock in 20 to 30 MHz steps and run a benchmark after each one. (Image: MSI)
If the run is clean, click the save icon to store a profile, then repeat from step 2.
When you hit a crash or artifacts, restart the PC, reload your last clean profile and stop raising the core clock.
Now raise Memory Clock (MHz) in steps of 50 to 100 MHz and run the benchmark again.
Memory is raised in larger steps, 50 to 100 MHz at a time. (Image: MSI)
If you see glitches, drop the memory clock by 10 MHz until they stop, then save the profile. Compare the score with your last run, because too much memory speed can lower performance.
Back off slightly from the final numbers. A small margin helps long-term stability.
How to Overclock an AMD GPU Manually
Radeon owners can skip Afterburner and use the tuning controls built into AMD Software. This follows AMD’s support documentation.
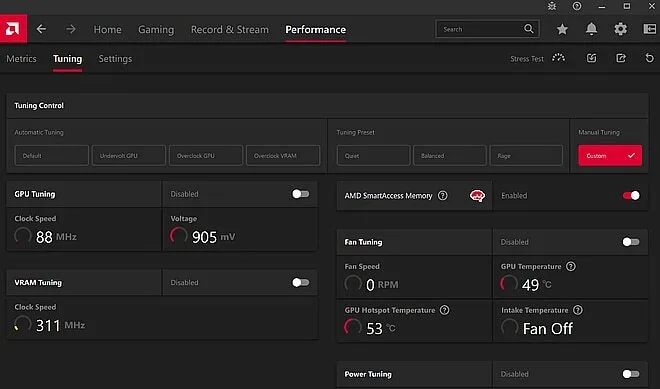
Open Performance then Tuning, choose Manual Tuning: Custom, read the warning and click I Accept.
Turn on GPU Tuning. The Min Frequency, Max Frequency and Voltage sliders appear on RX 6000 series and newer cards, and some cards show only a Max Frequency slider.
Choose Custom under Manual Tuning, then switch on GPU Tuning and VRAM Tuning. (Image: AMD)
Raise the Max Frequency (%) slider a few percent. Turn on Advanced Control if you prefer to type values in MHz.
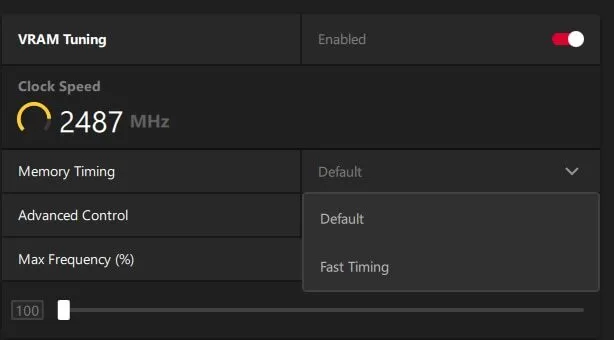
Switch on VRAM Tuning and raise its Max Frequency slider a little. The Memory Timing menu offers a Fast Timing preset on RX 5000 series cards and newer.
VRAM Tuning has its own Max Frequency slider and a Memory Timing menu. (Image: AMD)
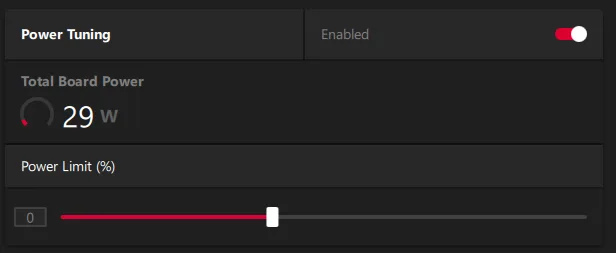
Switch on Power Tuning and raise the Power Limit (%) slider. A higher limit can give the card more room to boost.
The Power Limit slider sits under Power Tuning. (Image: AMD)
Click Apply Changes. The reset arrow icon returns every setting to default at any time.
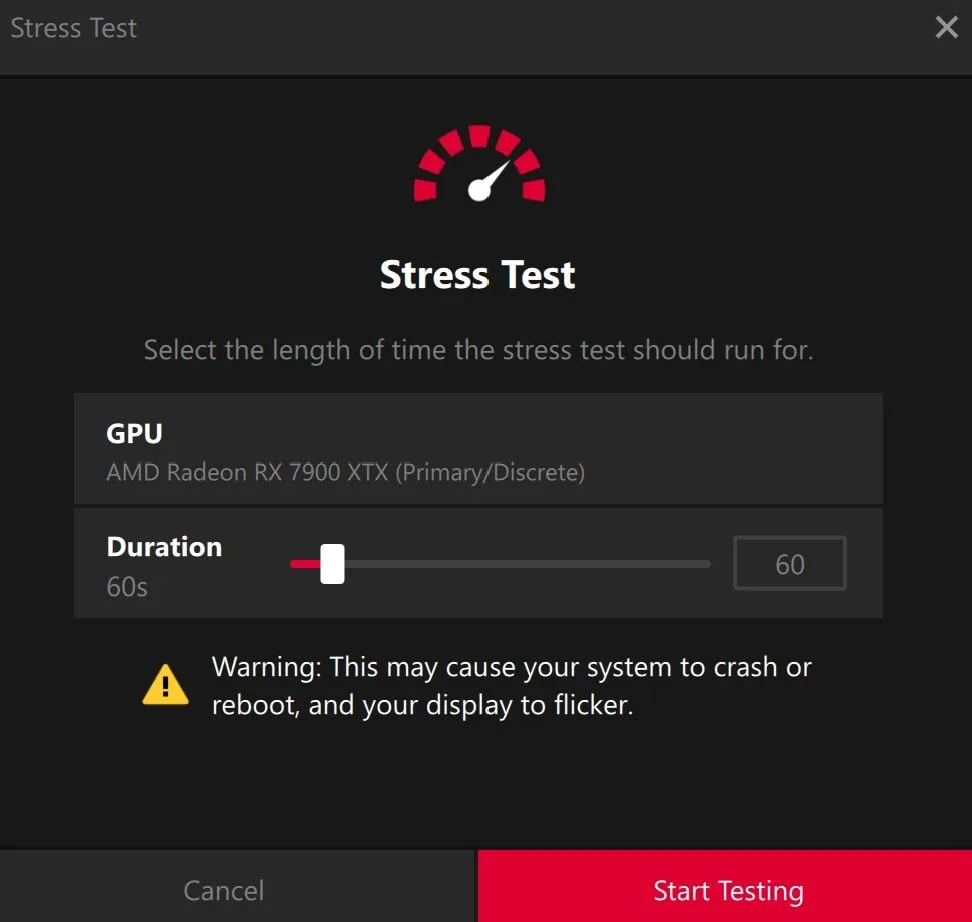
Click Stress in the top right, leave the default 60 seconds and click the red start button. If the run crashes or reboots the PC, AMD Software resets the tuning settings to default, so start again with smaller steps.
AMD’s built-in stress run defaults to 60 seconds. It can crash the PC if the overclock is too high. (Image: AMD)
Click Export Profile, name the profile and save it so you can import it later.
How to Check That Your Overclock Is Stable
Run a demanding benchmark for 10 minutes while watching for flicker, black screens, shapes that should not be there or a crash.
Play two or three different games you own for 20 to 30 minutes each. A setting that passes a benchmark can still fail in a game that loads the card differently.
Watch the temperature. Keep the GPU under 90°C (194°F), and ease off if it gets close.
Leave a looping benchmark running for a few hours before you call the settings final.
Compare average frame rate with your baseline. If the gain is only a couple of frames, a lower and quieter setting may be the better choice.
GPU Overclocking Problems and Fixes
Driver crash or black screen during a run: the clock is too high. Restart, reload your last clean profile and lower the core clock a step.
Artifacts such as sparkles or flashes of black: usually memory clock. Lower the memory clock by 10 MHz at a time until they stop.
Screen stays black and frozen for a few minutes: hold the PC power button for more than 4 seconds to force a shutdown, or flip the power supply switch off, wait 10 seconds and switch it back on.
PC shuts off under load: the power supply may be tripping on power spikes. Use a separate cable from the supply to each card connector instead of a daisy chained pigtail.
Temperatures climb and the clock drops: the card is thermal throttling. Improve case airflow or raise the fan curve.
Settings vanish after a driver update: reopen your tuning tool and reload the saved profile.
Can You Overclock a Laptop GPU or Use BIOS Settings?
Laptops can often be overclocked in Afterburner, but they run into thermal limits quickly, so use smaller steps and watch both CPU and GPU temperatures. Laptop GPUs can also have compatibility problems with overclocking tools, and running at higher clocks shortens battery life. On a desktop, the software tools above are all you need.
Is It Worth Overclocking Your GPU?
For most gamers, yes, as long as you stay with the automatic scanner or a small manual boost. It costs nothing, it is reversible with one click, and it can add a few frames on a card that is just short of a smooth target. If you want the lowest risk, run the NVIDIA app or AMD Software auto tuning and leave it there. If you enjoy tinkering, use Afterburner, change one slider at a time, and save a profile after every clean run. Skip it if your card already runs hot, your power supply is marginal or you are on a laptop with locked limits, because those cases are better solved by cooling or by an upgrade. If you decide your card is past saving, our best graphics card for gaming guide sorts upgrades by budget, and the best GPU under 500 roundup covers the mid-range. Whichever method you pick for how to overclock GPU settings, keep your last stable profile and trust the one that survived real games.
I'm Iain, and I write the step-by-step guides on GameCuki. I cover game tips and walkthroughs, PC gaming how-tos like settings, performance and troubleshooting, and practical guides for Steam, PlayStation, Xbox and Nintendo Switch. I build each guide from official game and platform documentation, write the steps in plain language and check them against the source before publishing. When a game or platform changes how something works, I update the guide. You can read my full process on our How We Review page.