Resizable BAR is a free setting that can lift frame rates in some games, but most PCs ship with it switched off. If you want to know how to enable Resizable BAR, the work happens in your motherboard BIOS, and the whole job takes a few minutes once your hardware supports it. This guide covers what to check first, the exact BIOS options to change, how to confirm it is active in Windows, and what to do when the option refuses to show up.
Prefer to watch first? This video walks through the setting for AMD, Intel, and NVIDIA systems:
MAKE YOUR GPU FASTER! Resizable Bar Guide For AMD/Nvidia/Intel
What Resizable BAR Does and Whether It Is Worth Turning On
By default the CPU can reach only 256MB of your graphics card’s memory at a time. Resizable BAR removes that limit so the CPU can address the whole memory pool, which cuts transfer overhead. The gain depends on the game, the settings, and the resolution. Some titles see almost nothing and others improve by a noticeable margin, so it is not a guaranteed boost. Because the setting costs nothing, it is worth switching on for any supported gaming PC. NVIDIA and AMD use different names for the same idea: NVIDIA says Resizable BAR (ReBAR), while AMD calls it Smart Access Memory (SAM).
What You Need Before You Enable Resizable BAR
Your CPU, motherboard, graphics card, and graphics driver all have to support it. If one piece does not, the option stays hidden or does nothing. Work through this list first.
A supported graphics card. That means a GeForce RTX 30 Series card or newer, a Radeon RX 6000 Series card or newer, or an Intel Arc card. Intel Arc cards depend on the feature to perform well, so Intel treats it as a must for that line.
A supported CPU and chipset. NVIDIA’s launch list named AMD Ryzen 5000 series with 500 Series boards (or 400 Series boards that support those chips) and Intel 10th and 11th Gen Core processors on matching chipsets. Newer platforms support it as well.
The latest motherboard BIOS. Many boards gained the Resizable BAR options through a firmware update, so install the newest BIOS from your board maker before you start.
A current graphics driver. If you are not sure yours is current, follow our guide on how to update GPU drivers first.
UEFI boot with a GPT disk. Windows has to boot in UEFI mode, not Legacy. Press Windows key + R, type msinfo32, and look at BIOS Mode. It should read UEFI.
A graphics card BIOS (VBIOS) that supports it. Some RTX 30 Series cards needed a VBIOS update from the card maker. Only flash firmware made for your exact model.
If BIOS Mode says Legacy, your Windows install is on an MBR disk. Windows includes the mbr2gpt /convert /allowFullOS command to convert it, run from an administrator Command Prompt. Back up your files first, because switching a Legacy install to UEFI the wrong way can leave Windows unable to boot.
How to Enable Resizable BAR in BIOS
Option names differ by motherboard brand and BIOS version, but the steps are the same on every board. The screenshots below come from an ASUS board, and your screen will look different if you use MSI, Gigabyte, or ASRock.
Restart your PC and press the BIOS key as it boots. It is usually Delete, and on some boards F2.
If your board offers an Advanced Mode, switch to it.
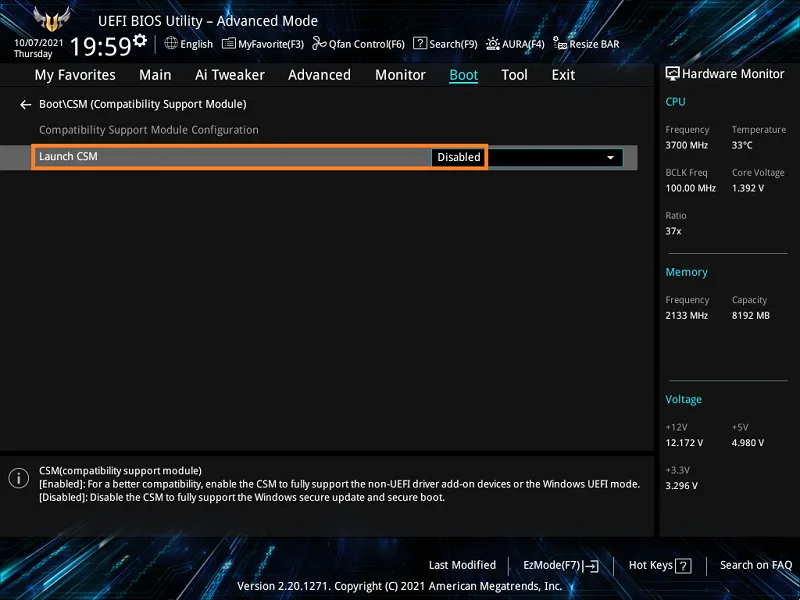
Open the boot settings and set CSM (Compatibility Support Module) or Legacy Mode to Disabled, with boot mode set to UEFI. On ASUS boards the setting is called Launch CSM under Boot > CSM.
Set Launch CSM to Disabled so Resizable BAR can be turned on. (Image: ASUS)
Find Above 4G Decoding (some boards label it Above 4G Memory) and set it to Enabled. On many boards the Resizable BAR option stays hidden or greyed out until this one is on. On MSI boards it sits under Settings > Advanced > PCI Subsystem Settings.
Set Re-Size BAR Support to Enabled. If Enabled is not offered, choose Auto. On AMD boards the same switch may be called Smart Access Memory or Clever Access Memory.
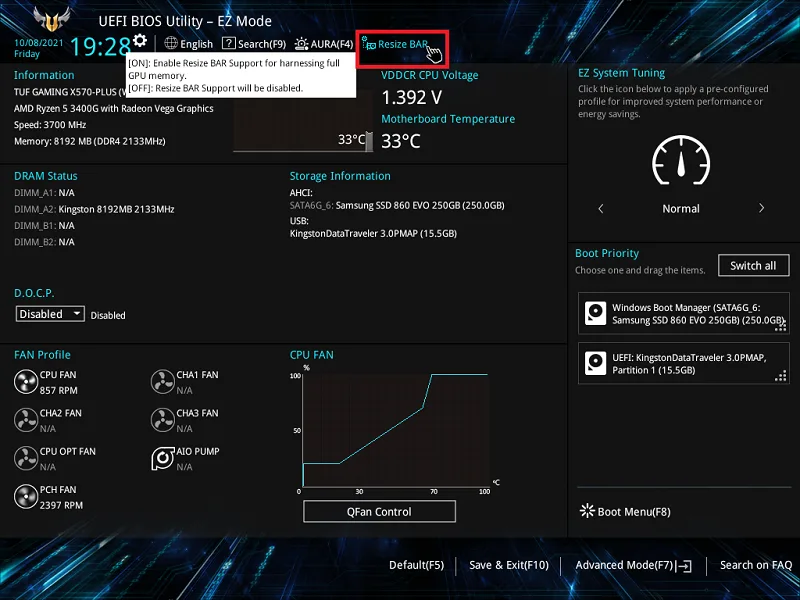
Newer ASUS boards put a Resize BAR toggle in the top bar of EZ Mode. Click it to turn the feature on. (Image: ASUS)
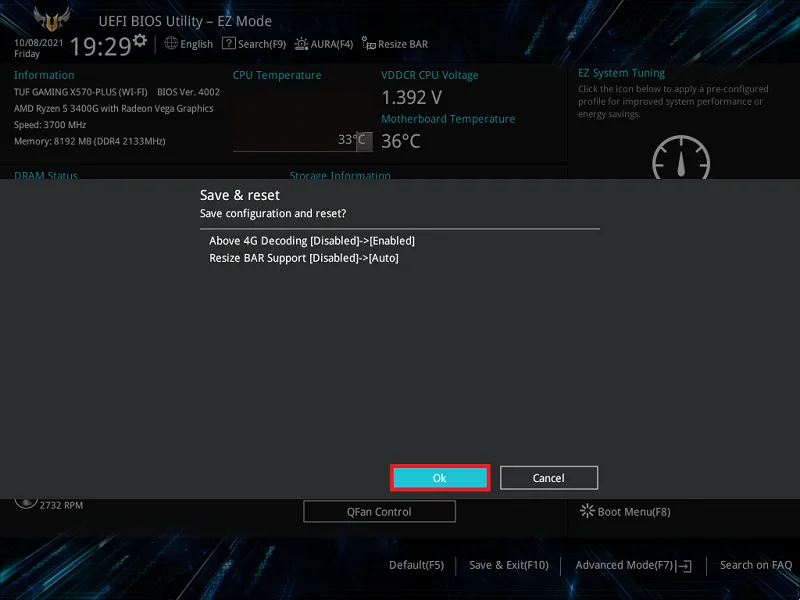
Press F10, confirm with OK, and let the PC restart into Windows.
Save your changes with F10 and let the system reboot. (Image: ASUS)
How to Enable Resizable BAR on NVIDIA, AMD, and Intel Graphics Cards
Once the BIOS setting is on, there is no separate switch to flip in Windows on most systems. The graphics driver picks it up after the reboot.
NVIDIA GeForce: Install a current Game Ready Driver. NVIDIA uses per-game profiles to turn the feature on only where it helps, so a few games will not use it even when it is enabled in the BIOS.
AMD Radeon: Install the current AMD Software: Adrenalin Edition driver. Smart Access Memory is reported in the software once the BIOS setting is on.
Intel Arc: Keep Resizable BAR enabled in the BIOS and the Arc driver current. Intel Driver and Support Assistant and Arc Control can confirm the status.
How to Check That Resizable BAR Is Enabled
Use one of these checks after the reboot.
NVIDIA Control Panel
Right-click the desktop and open NVIDIA Control Panel.
Select Help, then System Information.
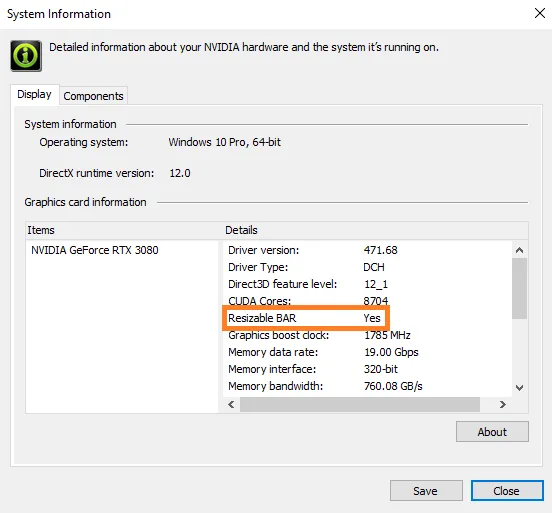
Find Resizable BAR in the list. Yes means it is active. No means the BIOS setting is still off or a requirement is missing.
Resizable BAR shows Yes in NVIDIA Control Panel when it is working. (Image: ASUS)
GPU-Z (Any Graphics Card)
Download and run GPU-Z as administrator.
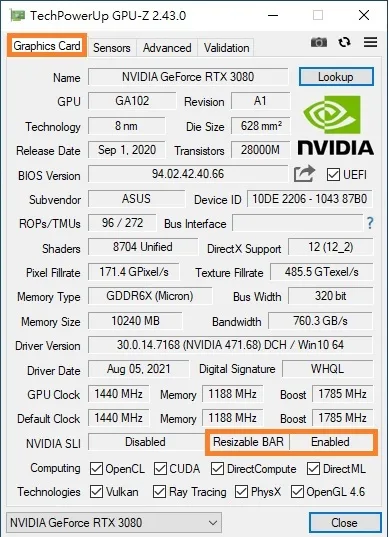
On the Graphics Card tab, find Resizable BAR. Enabled means it is active.
GPU-Z shows Enabled next to Resizable BAR once the feature is on. (Image: ASUS)
AMD Software and Intel Arc
On a Radeon card, open AMD Software: Adrenalin Edition and look for the Smart Access Memory status. The menu location varies by driver version. On Intel Arc, check Arc Control or Intel Driver and Support Assistant, or use GPU-Z.
Resizable BAR Option Missing or Not Working? Fixes to Try
Update the motherboard BIOS. Boards from around 2019 onward often added Above 4G Decoding and Resizable BAR in a firmware update. This is the most common fix.
Turn on Above 4G Decoding first. The Resizable BAR option can stay hidden until it is on.
Disable CSM and use UEFI boot. Resizable BAR needs CSM off, which in turn needs Windows installed in UEFI mode on a GPT disk.
Check the graphics card. The card, its VBIOS, and the driver all have to support it. Some RTX 30 Series cards needed a VBIOS update from the maker.
Check your CPU and board generation. Older platforms may not offer the setting at all, even on the latest BIOS. Your board manual or maker support page lists support.
Look under another name. The option can appear as Re-Size BAR, Smart Access Memory, or Clever Access Memory, and it may sit under PCIe or PCI Subsystem settings in the Advanced tab.
Should You Enable Resizable BAR on Your Gaming PC?
If your hardware supports it, yes. Knowing how to enable Resizable BAR takes a few minutes, it costs nothing, and the worst case is a game that behaves the same as before. Expect the biggest gains in supported games on AMD systems and Intel Arc cards, and smaller or no change in others. If the BIOS option is missing, update your motherboard firmware before anything else, then work back through the checklist above.
I'm Iain, and I write the step-by-step guides on GameCuki. I cover game tips and walkthroughs, PC gaming how-tos like settings, performance and troubleshooting, and practical guides for Steam, PlayStation, Xbox and Nintendo Switch. I build each guide from official game and platform documentation, write the steps in plain language and check them against the source before publishing. When a game or platform changes how something works, I update the guide. You can read my full process on our How We Review page.