Learning how to make a Roblox game takes one free program, a Roblox account and a computer, and you can have a playable place published in a single session. Roblox Studio is the tool behind every experience on the platform, and this guide walks you through installing it, building a first place, adding a script, trying it out and putting it online.
How to Create a Roblox Game (Beginner Tutorial 2026 Step-by-Step Guide)
Building a Roblox game costs nothing, but the setup has a few firm requirements. Check these first so the install goes smoothly.
A free Roblox account. You can create one at roblox.com. The same account lets you play in the Roblox app and build in Studio, and it is the account your game will be published under.
A Windows or Mac computer. Roblox lists Studio for Windows and Mac only. The minimum is Windows 10 or macOS 10.14 with 3 GB of RAM. The recommended setup is Windows 11 or macOS 14 or newer with 8 GB of RAM and a screen resolution of 1600 by 900 or higher.
A mouse with two buttons and a scroll wheel. Roblox strongly recommends one because moving around the 3D space is much easier with it.
Can You Make a Roblox Game on Mobile, iPad or Chromebook?
Not with Studio itself. Roblox lists the program for Windows and Mac computers only, so there is no official Studio app for phones, tablets, Chromebooks or Xbox. The Roblox app on those devices is for playing games. If you only have one of them, plan to use a Windows or Mac computer at home, at school or at a library for the building part.
How to Install Roblox Studio
Roblox Studio is free and installs like any other desktop program.
Go to the Roblox Creator Hub and click Download Studio.
In the pop-up window, click Download Studio again.
Open your browser’s download history and double-click the installer. It is called RobloxStudio.exe on Windows and RobloxStudio.dmg on a Mac.
When the installation finishes, a confirmation pop-up appears. Click Launch Studio.
Log in with your Roblox account.
Keep your account safe while you are at it: never share your password, and ignore any site or player that promises free Robux.
How to Start Your First Roblox Game
Studio opens on a landing page that lists project templates. Each template gives you a ready-made starting place, so you do not have to build everything from nothing.
Open Roblox Studio. The landing page shows every available template.
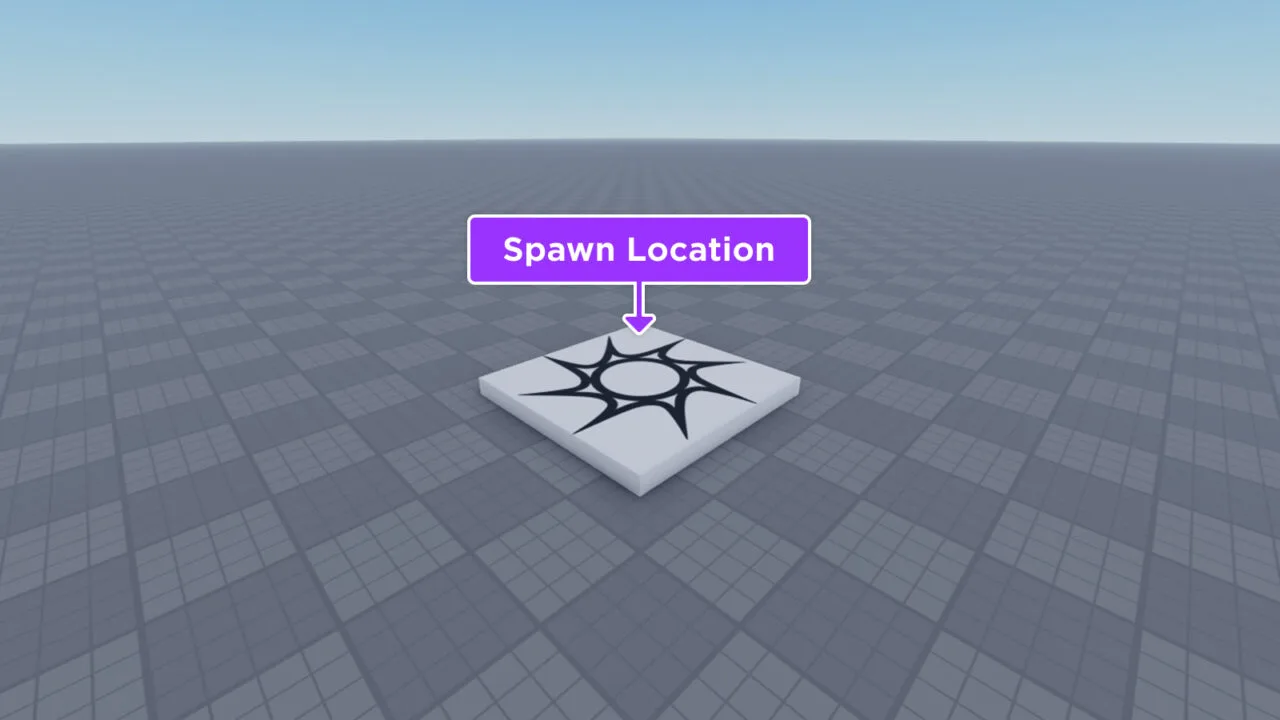
Click the Baseplate template. Studio opens a new game with a spawn location and a baseplate.
A new Baseplate place. The spawn location is where players appear and respawn. (Image: Roblox)
Baseplate is a good first choice because it is a neutral world: the spawn location is where player characters appear when they join, and the baseplate is a floor with a 4 by 4 grid texture that helps you line objects up. Other templates, such as Platformer, Racing and Modern City, suit specific genres once you know what you want to build.
Learn the Studio Window
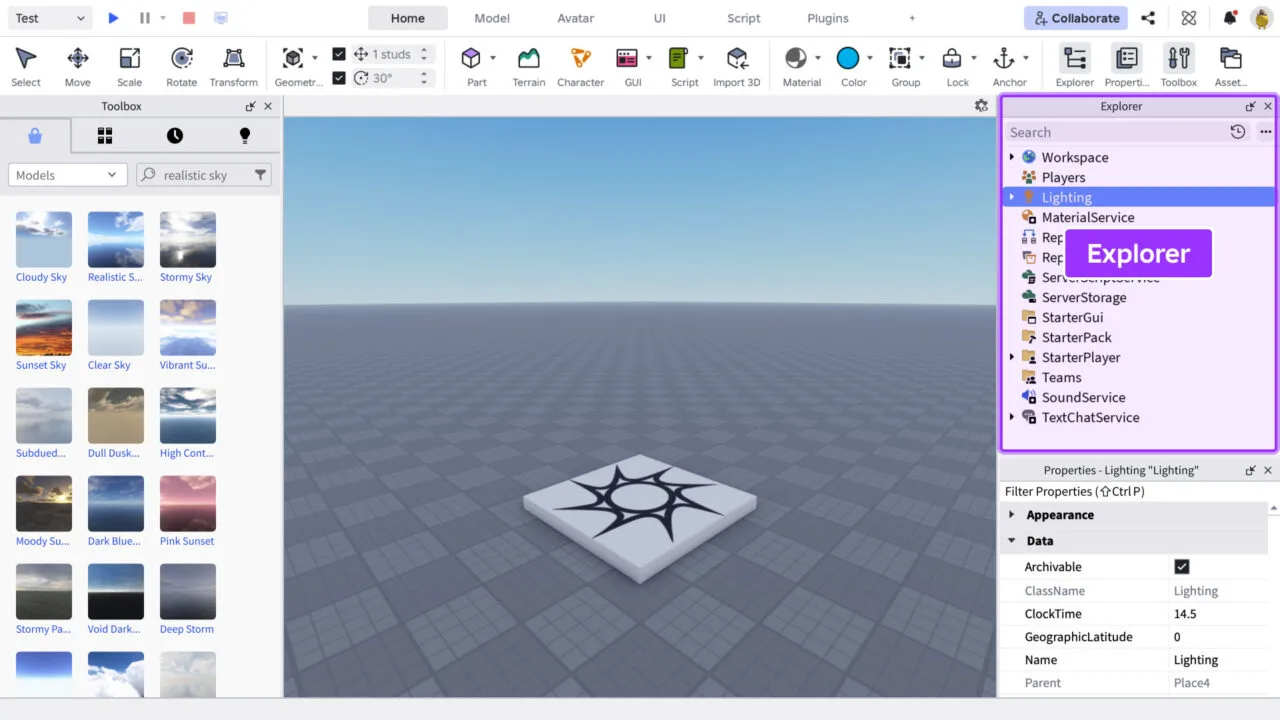
You will spend most of your time in a handful of windows.
3D viewport: the big center area where you see and edit your world.
Explorer: a list of every object in your place, such as the Workspace, the spawn location and your scripts.
Properties: the settings for whatever object you have selected, including its color, size and position.
Toolbox: a library of models, images, audio and more from Roblox and other creators, with Creator Store, Inventory, Recent and Creations tabs.
Toolbar tabs: Home, Model, Avatar, UI, Script and Plugins filter the tools along the top.
The Toolbox sits on the left, the 3D viewport in the middle and the Explorer and Properties windows on the right. (Image: Roblox)
Click inside the viewport before you try to move the camera. These controls cover most of what you need:
W, A, S, D: move the camera forward, left, back and right.
Q and E: move the camera down and up.
Shift plus a movement key: changes the camera speed.
F: focuses the camera on the selected part.
Right mouse button, then drag: looks around.
Scroll wheel: zooms in and out.
Middle mouse button, then drag: pans the camera.
How to Build Your Roblox Game World
Everything you see in a place is built from objects. The simplest one is a Part, which comes in five shapes: ball, block, cylinder, wedge and corner wedge. Meshes are more detailed shapes made in outside modeling programs, and you can pull ready-made ones from the Toolbox.
On the Home tab, use the Part button to insert a block into your place.
Click the part in the viewport or in the Explorer. The Properties window now shows that part’s settings.
In Properties, change BrickColor to tint it, Size to scale it along the X, Y and Z axes, and Material to change how it looks.
Turn on Anchored for anything that should stay fixed in the air, such as a floating platform. Anchored parts are not pushed around by physics.
Copy and place more parts to build platforms, walls or a course, and use the Move, Scale and Rotate tools on the Home tab to line them up.
To add ready-made objects, open the Toolbox from the Home tab or the Window menu and browse the Creator Store, a marketplace with both free and paid assets. Anything you add shows up in the Explorer, where you can select and edit it like any other object. The Terrain Editor, also on the Home tab, is there for shaping land around your build.
How to Add a Script to Your Roblox Game
Parts and models make a place look right, but scripts make it behave. Roblox scripts are written in Luau. If you would rather not start from a blank page, Studio also has an Assistant tool in the top bar that can help with development tasks, so you can ask it for a script and then read through what it gives you.
Here is a simple first mechanic: a coin that disappears for ten seconds when a player touches it.
In the Explorer, insert a new folder inside Workspace and name it Coins.
Inside the folder, insert a cylinder part and name it Coin.
In Properties, set BrickColor to Gold, Material to Metal, Size to 0.6, 8, 4 and Orientation to 90, 0, 0 so the coin lies flat like a disc.
Turn off CanCollide so players can walk through the coin, and turn on Anchored so physics does not move it.
Duplicate the coin a few times and scatter the copies around your place. Keep every copy named Coin.
In the Explorer, insert a new Script inside ServerScriptService and name it CoinService. Scripts in this service run on the server.
Replace the default code with the script below.
local Workspace = game:GetService("Workspace")
local Players = game:GetService("Players")

local coinsFolder = Workspace.Coins
local coins = coinsFolder:GetChildren()

local COOLDOWN = 10

local function onCoinTouched(otherPart, coin)
	if coin:GetAttribute("Enabled") then
		local character = otherPart.Parent
		local player = Players:GetPlayerFromCharacter(character)
		if player then
			coin.Transparency = 1
			coin:SetAttribute("Enabled", false)
			print("Player collected coin")
			task.wait(COOLDOWN)
			coin.Transparency = 0
			coin:SetAttribute("Enabled", true)
		end
	end
end

for _, coin in coins do
	coin:SetAttribute("Enabled", true)
	coin.Touched:Connect(function(otherPart)
		onCoinTouched(otherPart, coin)
	end)
end
The script gathers every part in the Coins folder and listens for the Touched event on each one. When a player’s character touches an enabled coin, the coin turns invisible, a message is printed to the Output window, and the coin comes back after the ten-second cooldown.
How to Playtest Your Roblox Game
Run your place before you publish it so you can catch problems early.
In the top bar at the left of the Studio window, pick a playtest mode from the dropdown menu and click the Play button to its right.
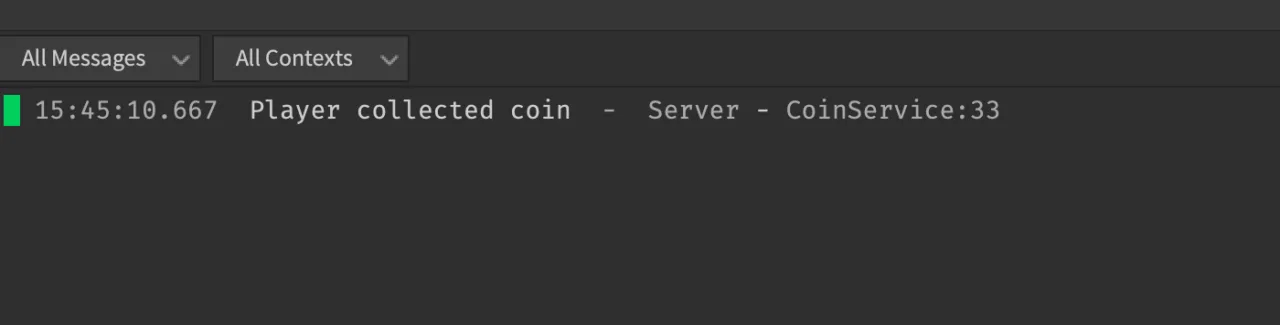
Walk your character into one of the coins. If the script works, the coin disappears, the Output window prints Player collected coin, and the coin returns ten seconds later.
Click Stop (or press Shift+F5) when you are done. Studio resets every object to how it was before the playtest.
Choose a mode from the dropdown, then click the Play button next to it. (Image: Roblox)The Output window confirms the coin script ran. (Image: Roblox)
Solo playtesting runs a separate client and server, and a button in the top bar lets you switch between the two views. That closely mirrors how the game behaves once real players join. If something breaks, the Output window is the first place to look for error messages.
How to Publish Your Roblox Game
Until you publish, your place only exists on your computer. Publishing saves it to the cloud and ties it to your account.
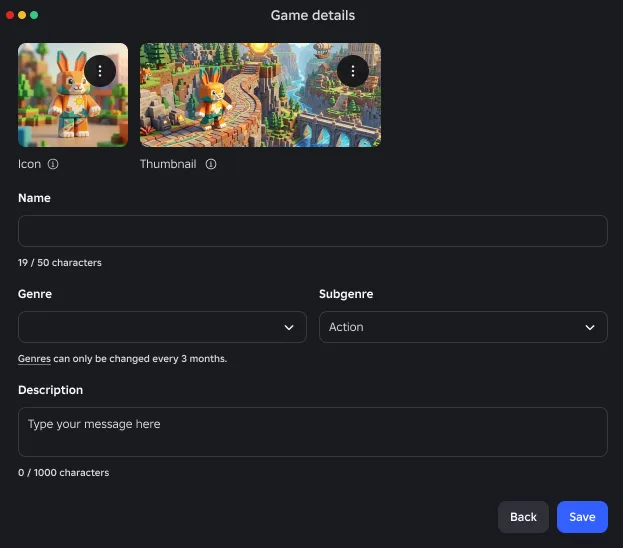
In Studio, go to File > Publish. The Game details window opens.
Upload an icon and a thumbnail.
Type a Name, pick a Genre (the Subgenre is optional) and write a Description.
Click Save. Roblox publishes the game and the Publish window appears.
Fill in the icon, thumbnail, name, genre and description, then click Save. (Image: Roblox)
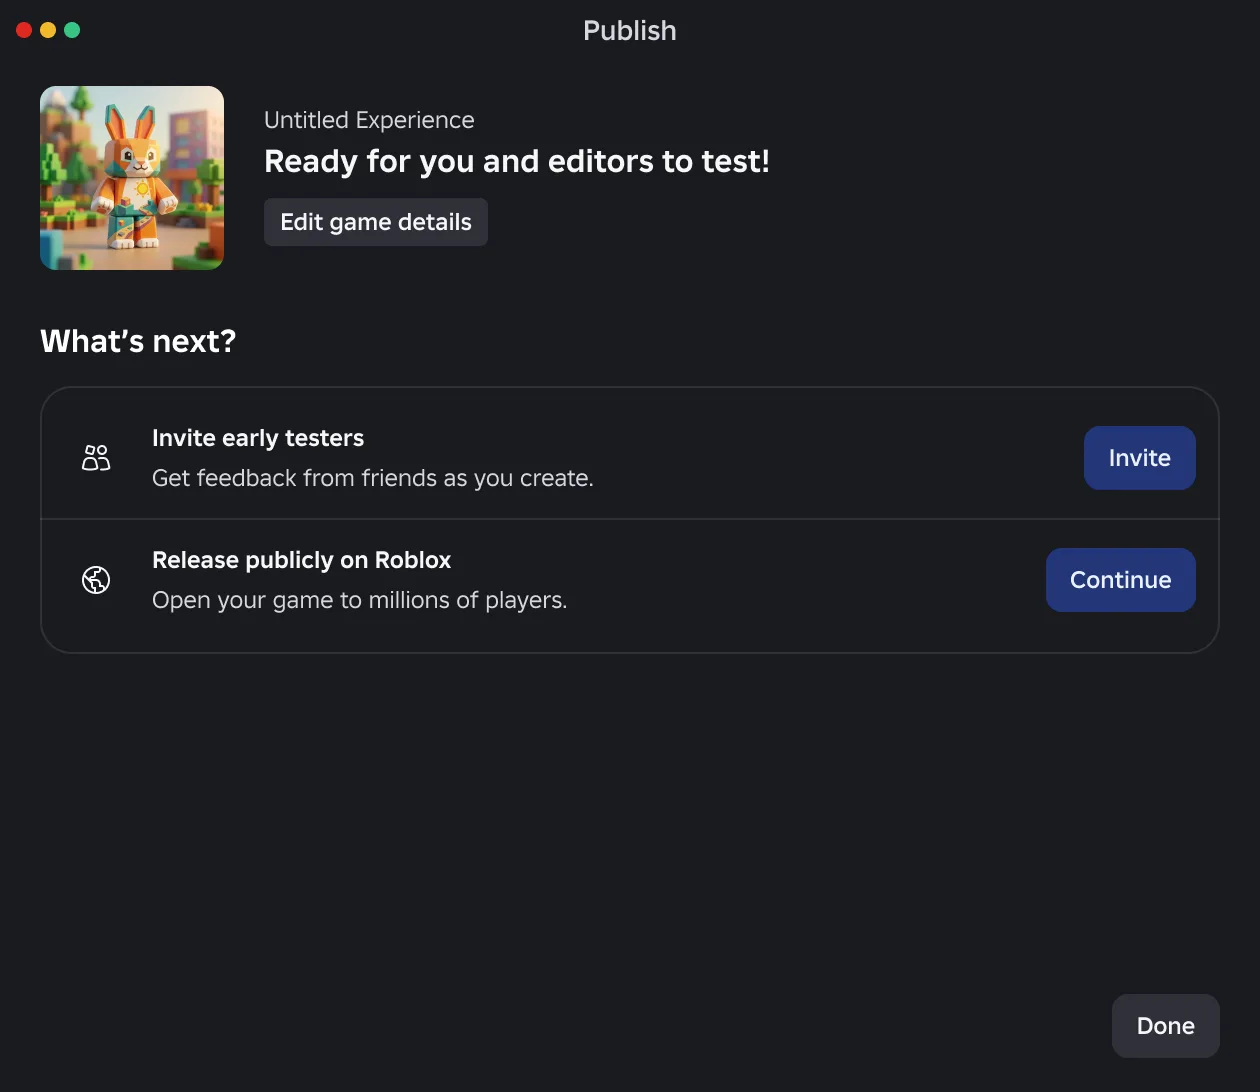
A newly published game is private. Only you, and anyone you give access, can open it, so you can keep polishing before anyone else sees it. The Publish window then offers two next steps.
After saving, choose whether to invite early testers or release the game publicly. (Image: Roblox)
Invite Friends to Try Your Game First
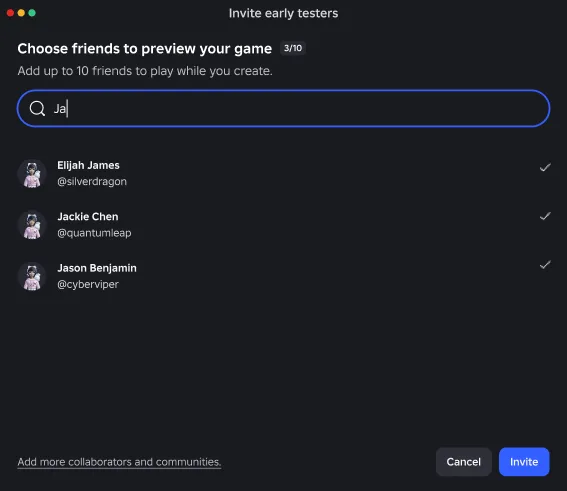
Go to File > Invite early testers, or click Invite in the Publish window.
Search for friends and pick up to 10 of them, then click Invite. You may be asked to complete an age check first.
Pick up to 10 friends to try the game before it goes live. (Image: Roblox)
Looking for something to show off your game next to? Our list of the best Roblox games to play with friends shows what polished multiplayer experiences look like.
How to Make Your Roblox Game Public
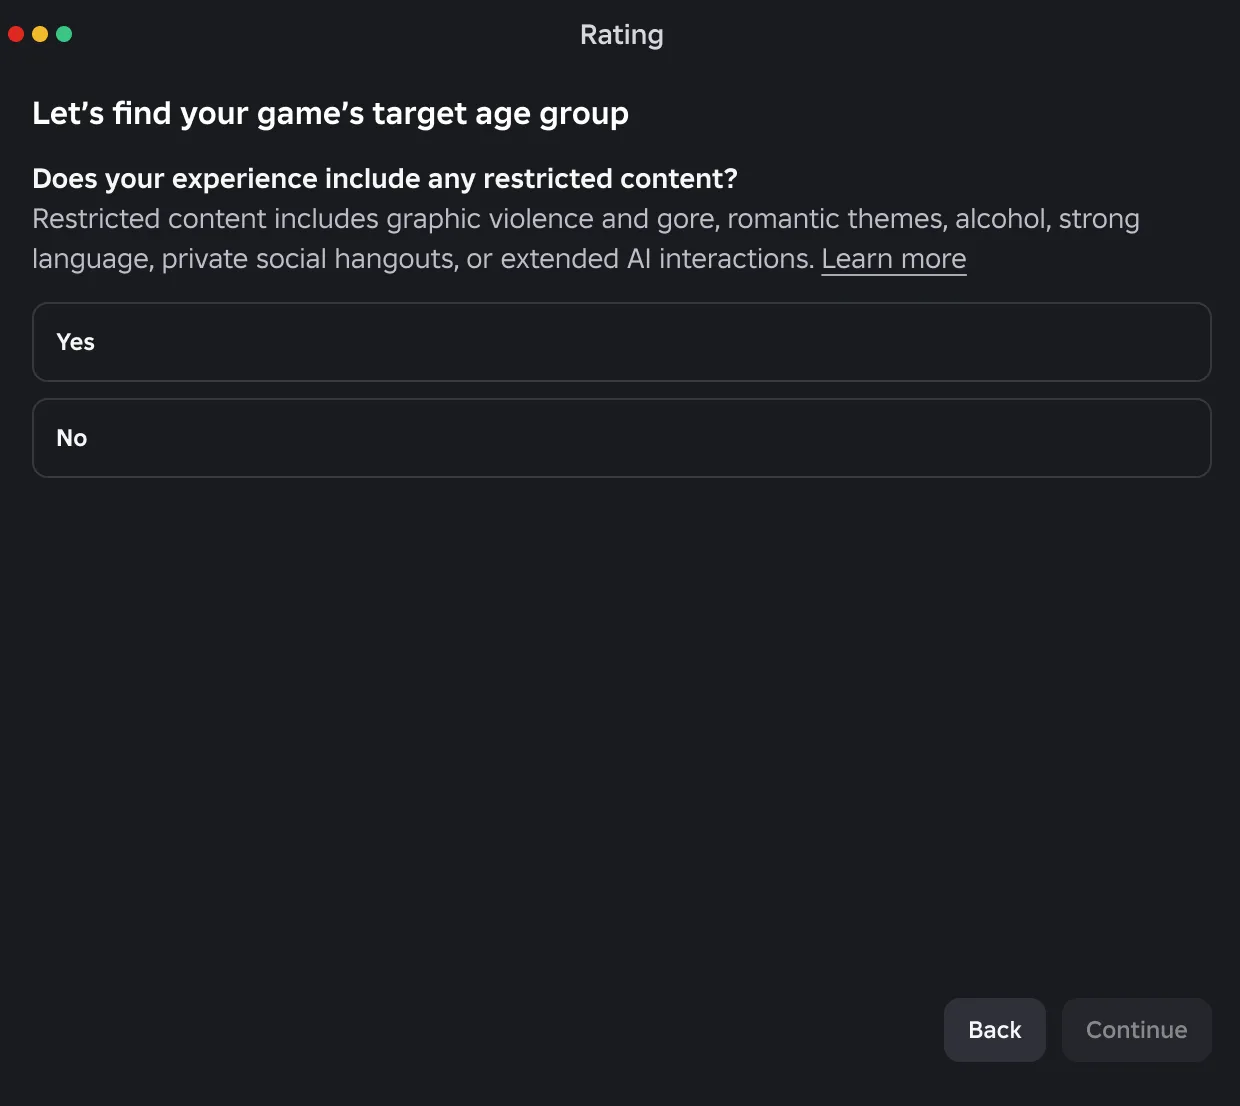
In Studio, go to File > Publish, then click Continue under the public release option. A short questionnaire starts.
Answer whether your game has restricted content such as graphic violence, romantic themes, alcohol, strong language, private social hangouts or extended AI interactions.
If you answer Yes, finish the questionnaire and click Publish. If you answer No, click Publish and the game goes out with a Content May Vary label to age-checked users 16 and older.
Open the Creator Dashboard, select your game and go to Publish settings > Manage Audience.
Click Manage access, open the Public tab and turn the Friends toggle off so anyone on Roblox can play, within age and regional limits. Click Save Changes.
The release questionnaire asks whether your game has restricted content. (Image: Roblox)
A few limits apply. Your account must be in good standing and at least 2 days old, and you must complete an age check to release to players 16 and older. Releasing to all ages needs extra steps such as account verification and two-factor authentication. You can release up to 5 never-before-released games per day.
Ready to Make Your First Roblox Game?
The fastest way to learn how to make a Roblox game is to finish something small. Start with the Baseplate template, build a few platforms, add the coin script, playtest it and publish it privately to a handful of friends. That one loop teaches you the Studio window, the Properties panel, scripting and publishing, and every bigger project repeats the same steps. Once the basics feel natural, move on to a theme you care about, whether that is an obstacle course or a racing map, and keep updating the same place as you learn.
I'm Iain, and I write the step-by-step guides on GameCuki. I cover game tips and walkthroughs, PC gaming how-tos like settings, performance and troubleshooting, and practical guides for Steam, PlayStation, Xbox and Nintendo Switch. I build each guide from official game and platform documentation, write the steps in plain language and check them against the source before publishing. When a game or platform changes how something works, I update the guide. You can read my full process on our How We Review page.